

NIT Excavator Operator Guide G4 · 2026
Excavator Electrical
System
Battery → starter → alternator · sensors → monitor
A practical operator guide to excavator batteries, starting and charging circuits, fuses, relays, wiring, sensors, warning signs, daily checks and fault reporting.
Operator electrical routine
How does an excavator electrical system work?
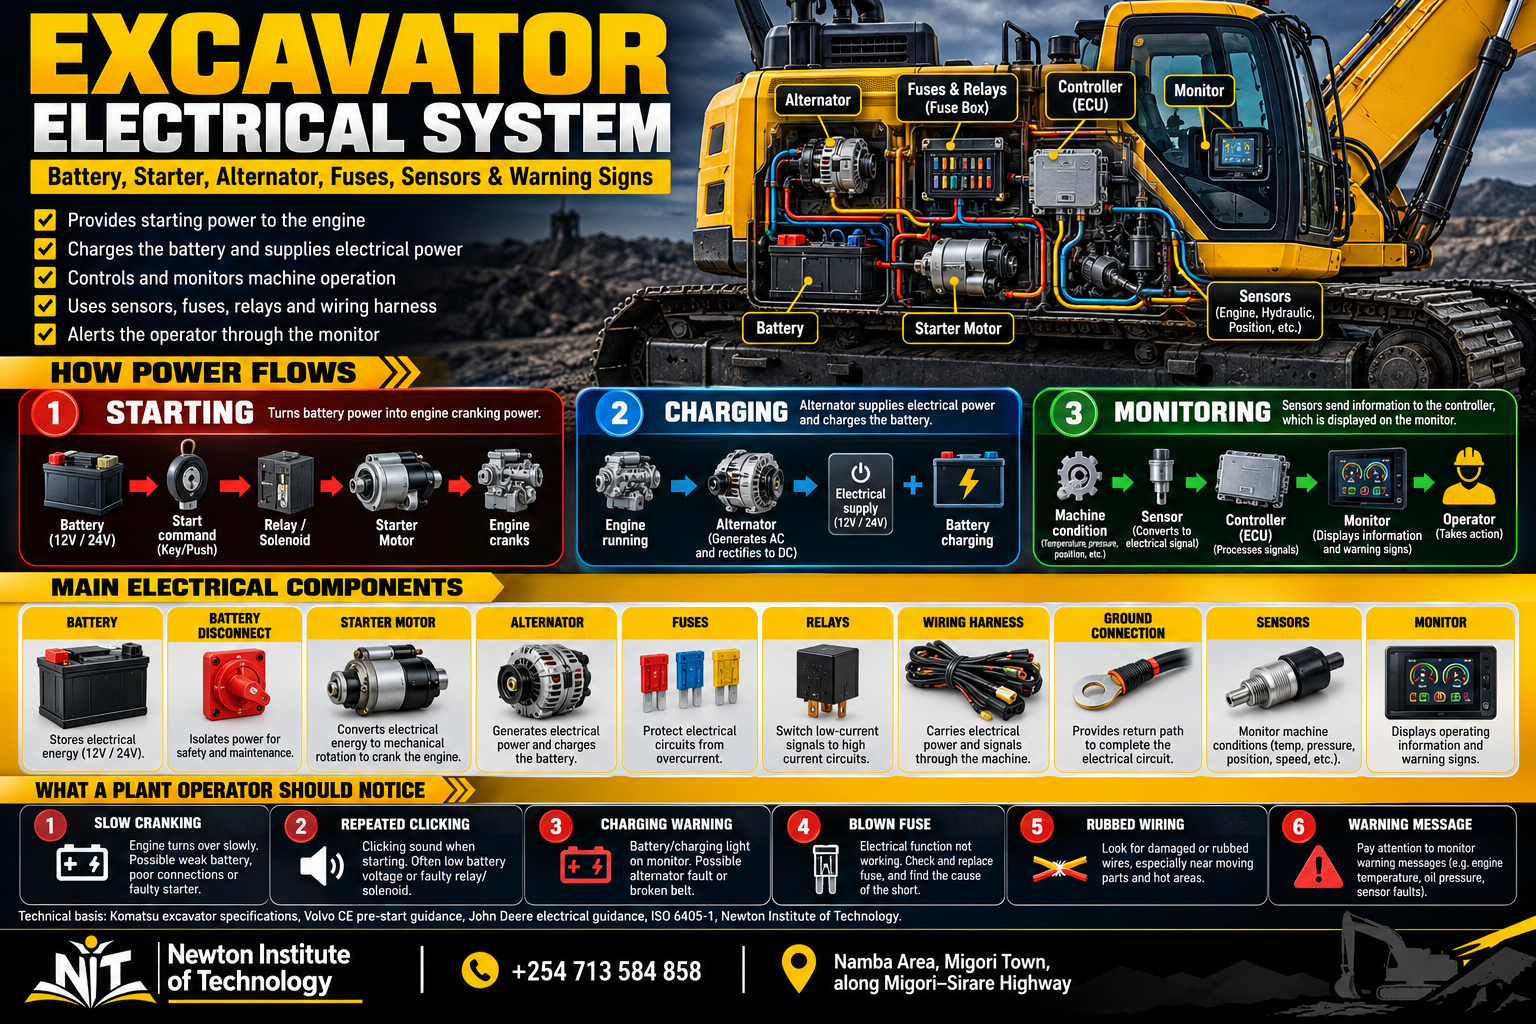
The electrical system performs four jobs: it supplies power, starts the engine, supports charging once the engine runs, and carries information between sensors, controllers and the operator monitor.
A current Komatsu PC650LC-11 illustrates the arrangement clearly: its standard electrical equipment includes two 12 V batteries, a 24 V alternator, a 24 V starter motor, a battery disconnect switch and circuit protection. [1]
The battery supplies the starting circuit and the starter motor turns the engine.
The alternator supports electrical demand and restores battery charge while the engine is running.
Sensors send machine-condition information through the electronic control system to the operator.
Electrical knowledge helps the operator notice change early, describe it clearly and give maintenance personnel useful evidence.
This guide owns the dedicated excavator electrical system topic. For the complete machine walk-around, use NIT’s Plant Operator Pre-Start Inspection Checklist. For whole-machine anatomy, use Excavator Parts and Functions. Hydraulic and cooling faults are covered in their own dedicated NIT guides. [7] [8] [9] [11]
System map
Main parts of the excavator electrical system
Learn each component by its job, then connect it to what you can observe from the cab or during the walk-around.
| Component | Main job | What the operator notices |
|---|---|---|
| Battery / batteries | Store electrical energy and supply starting power. | Cranking strength, terminal condition, cable condition. |
| Battery disconnect | Connects or isolates the main battery supply. | Correct position before startup and after shutdown. |
| Starter relay / solenoid | Switches and controls starter current. | Clicking or no response when START is selected. |
| Starter motor | Cranks the engine. | Normal, slow or absent cranking. |
| Alternator | Supplies charging output while the engine runs. | Charging warning, repeated battery discharge. |
| Fuses / circuit protection | Protect circuits against excessive current. | One circuit stops working or a fuse fails repeatedly. |
| Relays | Allow one circuit to electrically switch another. | A powered function may fail even when its final component is intact. |
| Wiring harnesses / connectors | Carry power and electrical signals. | Rubbing, cuts, heat damage, loose plugs or moisture. |
| Ground connections | Complete electrical return paths. | Loose or corroded ground straps and cables. |
| Sensors / switches | Detect temperatures, pressures, levels, speed, position and other conditions. | Gauge changes, messages and warning indications. |
| Electronic controllers | Process signals and command electrical functions. | Fault codes, controlled functions and monitor information. |
| Monitor / display | Communicates machine status to the operator. | Warnings, gauges, diagnostic information and messages. |
On a small screen, swipe horizontally to view the full table.
Battery power starts the engine. The alternator takes over the charging job once the engine runs. Sensors and controllers keep reporting machine condition to the monitor throughout the shift.
Operator value
25 reasons a plant operator needs this knowledge
Operators spend the longest continuous time with the machine. Electrical awareness improves daily inspection, makes abnormal behaviour easier to describe and gives maintenance personnel better evidence when a fault appears.
Recognise slow cranking
Notice when the engine turns more slowly than the machine’s normal starting pattern.
Recognise repeated clicking
Separate fast repeated clicking from a normal starter sound.
Separate no-crank from no-start
Know the difference between an engine that does not turn and one that turns but does not fire.
Understand battery supply
Know why the monitor can power up even when starting power is weak.
Understand the starter motor
Connect the starter directly to engine cranking.
Understand the alternator
Know what takes over the charging job after the engine starts.
Notice terminal corrosion
Catch visible battery-connection deterioration during the walk-around.
Notice damaged cables
Find cuts, rubbing and heat damage before a high-current cable fails.
Spot poor grounds
Recognise loose or damaged ground straps as part of the electrical path.
Find harness rubbing
See wiring that is slowly wearing against metal or another component.
Find crushed or heat-damaged wiring
Identify physical damage before it becomes an intermittent or open circuit.
Notice loose connectors
Catch plugs, clips and locks that have moved or become contaminated.
Understand fuse protection
Know that a fuse protects a circuit rather than simply powering a component.
Keep the specified fuse rating
Replace a fuse with the rating assigned to that circuit.
Treat repeated fuse failure as evidence
Record which circuit fails again instead of masking the symptom.
Understand relays
Know why a stopped electrical function does not automatically mean the final component has failed.
Understand sensors
Connect temperature, pressure, level, speed and position information to the electrical monitoring system.
Read monitor warnings accurately
Use the complete message or symbol instead of describing everything as “a light”.
Record fault codes correctly
Give maintenance personnel the exact code shown by the machine.
Describe intermittent faults
Explain whether a problem appears only hot, under load, on rough ground or during a particular movement.
Connect faults to machine activity
Record what the excavator was doing at the moment the fault appeared.
Notice display resets
Treat flickering, dimming and unexpected monitor restarts as useful electrical clues.
Recognise abnormal heat or smell
Identify a new electrical smell or visible overheating early.
Improve the morning electrical check
Turn battery, wiring and monitor inspection into a repeatable pre-start habit.
Improve defect reporting
Give a factual report that helps the technician begin testing in the right area.
A technician can test a circuit. The operator can explain what changed, when it changed and what the excavator was doing at the time. Those observations often shorten the path to the fault.
Power supply
Battery: where starting power begins
Before the engine runs, the battery supplies the electrical energy used by the starting and control systems. The monitor, relays, lights and controllers can all draw battery power, but the starter motor demands much more current than a small display or lamp.
That is why a monitor can switch on while the battery still lacks enough available power to crank the engine normally.
Battery security
Look for a battery that has shifted, loose hold-down hardware, physical damage or leakage.
Clean connections
Heavy corrosion or visible looseness around the posts can affect the main electrical path.
Insulation and routing
Check visible cable sections for cuts, rubbing, heat damage or poor support.
Volvo’s excavator pre-start guidance specifically includes the battery compartment and electrical box in the daily walk-around. [2]
Battery handling
Four battery rules worth remembering
Keep sparks away
Battery gas can ignite. Keep smoking, flames and spark-producing work away from the battery area.
Protect the terminals
Do not place metal across battery posts. Use the correct electrical test method.
Maintain polarity
Positive and negative connections must remain correct when servicing or booster starting.
Use the specified procedure
Follow the machine’s approved connection and starting sequence.
John Deere’s battery guidance covers flammable battery gas, spark control, metal contact across battery posts and correct booster-battery connections. [3]
Starting circuit
Starter motor: read the cranking symptom first
The starter motor turns the engine until the engine begins running under its own power. A simplified path is battery → start command → relay/solenoid → starter motor → engine cranks.
| What happens when START is selected? | Useful operator observation |
|---|---|
| Nothing on the machine has electrical power | Begin with the main battery supply, disconnect, cables and circuit protection. |
| Monitor is on but starter is silent | Record any interlock or monitor message and whether START changes anything. |
| One click is heard | Note where the click comes from and whether the display changes. |
| Repeated clicking occurs | Watch whether the monitor dims, flickers or resets. |
| Engine cranks slowly | Record whether the condition appeared suddenly or became worse over several starts. |
| Engine cranks normally but does not fire | The starter is turning the engine; record the engine and monitor information next. |
On a small screen, swipe horizontally to view the full table.
“The monitor powered normally, but repeated clicking started when I selected START and the engine did not turn” is a better fault report than “the starter is bad.”
Charging circuit
Alternator: what changes after the engine starts
The starter and alternator have different jobs. The starter uses stored battery energy to turn the engine. The alternator produces electrical output while the engine is running.
A machine can therefore start normally and still develop a charging problem later.
The PC650LC-11 example uses a 24 V/90 A alternator with two 12 V batteries and a 24 V starter motor. [1]
Machine-specific specification
Do excavators use 12 V or 24 V?
Excavators use model-specific electrical arrangements. Many medium and large machines use 24 V starting and charging systems, often built around two 12 V batteries.
Use the electrical specification for the excavator being operated before charging, testing, replacing batteries or connecting external electrical equipment. The Komatsu PC650LC-11 specification is one clear example of a 24 V starting and charging arrangement. [1]
Protection and switching
Fuses and relays: why one failed function does not tell the whole story
Protects the circuit
A fuse opens when current rises beyond its intended limit. A repeated failure directs attention to the protected circuit.
Switches another circuit
A relay allows a lower-current control circuit to operate another electrical load.
Repeated failure matters
Record which fuse failed, what stopped working and what the machine was doing when it happened.
John Deere’s electrical service guidance states that a replacement fuse must use the same rating as the original. [5]
If a correctly rated fuse fails again, investigate the protected circuit. Increasing the fuse rating removes the intended protection.
Power and signal paths
Wiring harnesses, connectors and grounds
An excavator wiring harness works in heat, vibration, dust, mud, water and constant machine movement. The best inspection points are where wiring passes near metal edges, clamps, hinges, moving structures, hot components and recently repaired areas.
| Condition | What to look for |
|---|---|
| Abrasion | Outer insulation worn where a harness touches another surface. |
| Cuts / crushing | Split insulation, flattened harnesses or exposed conductors. |
| Heat damage | Hardened, discoloured or melted insulation. |
| Loose routing | Harnesses hanging, moving excessively or missing support clips. |
| Connector damage | Broken plugs, locking tabs, moisture, oil or heavy contamination. |
| Ground connection | Loose, corroded or damaged ground cables and straps. |
On a small screen, swipe horizontally to view the full table.
Machine information
Sensors, controllers and the monitor
A sensor detects a condition and turns it into information the electronic system can use. Depending on the excavator, sensors and switches may report temperatures, pressures, levels, speed, position and aftertreatment conditions.
Temperature, pressure, level, speed or position changes.
The signal travels through wiring and connectors to the control system.
The monitor shows the gauge, message, symbol or warning.
ISO 6405-1:2017 standardizes common symbols used on earth-moving machinery operator controls and displays and remains current after its 2022 review. [6]
If the monitor reports a cooling-system or hydraulic-system condition, follow that system as well as the electrical information path. NIT covers those subjects separately in the Excavator Cooling System and Excavator Hydraulic System guides. [8] [9]
Operator observation
What the operator sees, hears or smells
| Observation | Information worth recording |
|---|---|
| Machine is completely dead | Does anything on the monitor or lighting circuit power up? |
| Monitor works but engine does not crank | What happens when START is selected? Any interlock message? |
| Repeated clicking | Does the monitor dim, flicker or restart? |
| Slow cranking | Did it start suddenly or worsen across several starts? |
| Charging warning after startup | Does it remain continuously once the engine is running? |
| Fuse fails again | Which circuit or function stopped working? |
| Monitor resets | Does it happen during cranking or normal operation? |
| Intermittent electrical function | What movement, load, temperature or weather condition triggers it? |
| Burning electrical smell | Where is the smell strongest? |
| Visible damaged wiring | Where is the damaged section and what might have contacted it? |
On a small screen, swipe horizontally to view the full table.
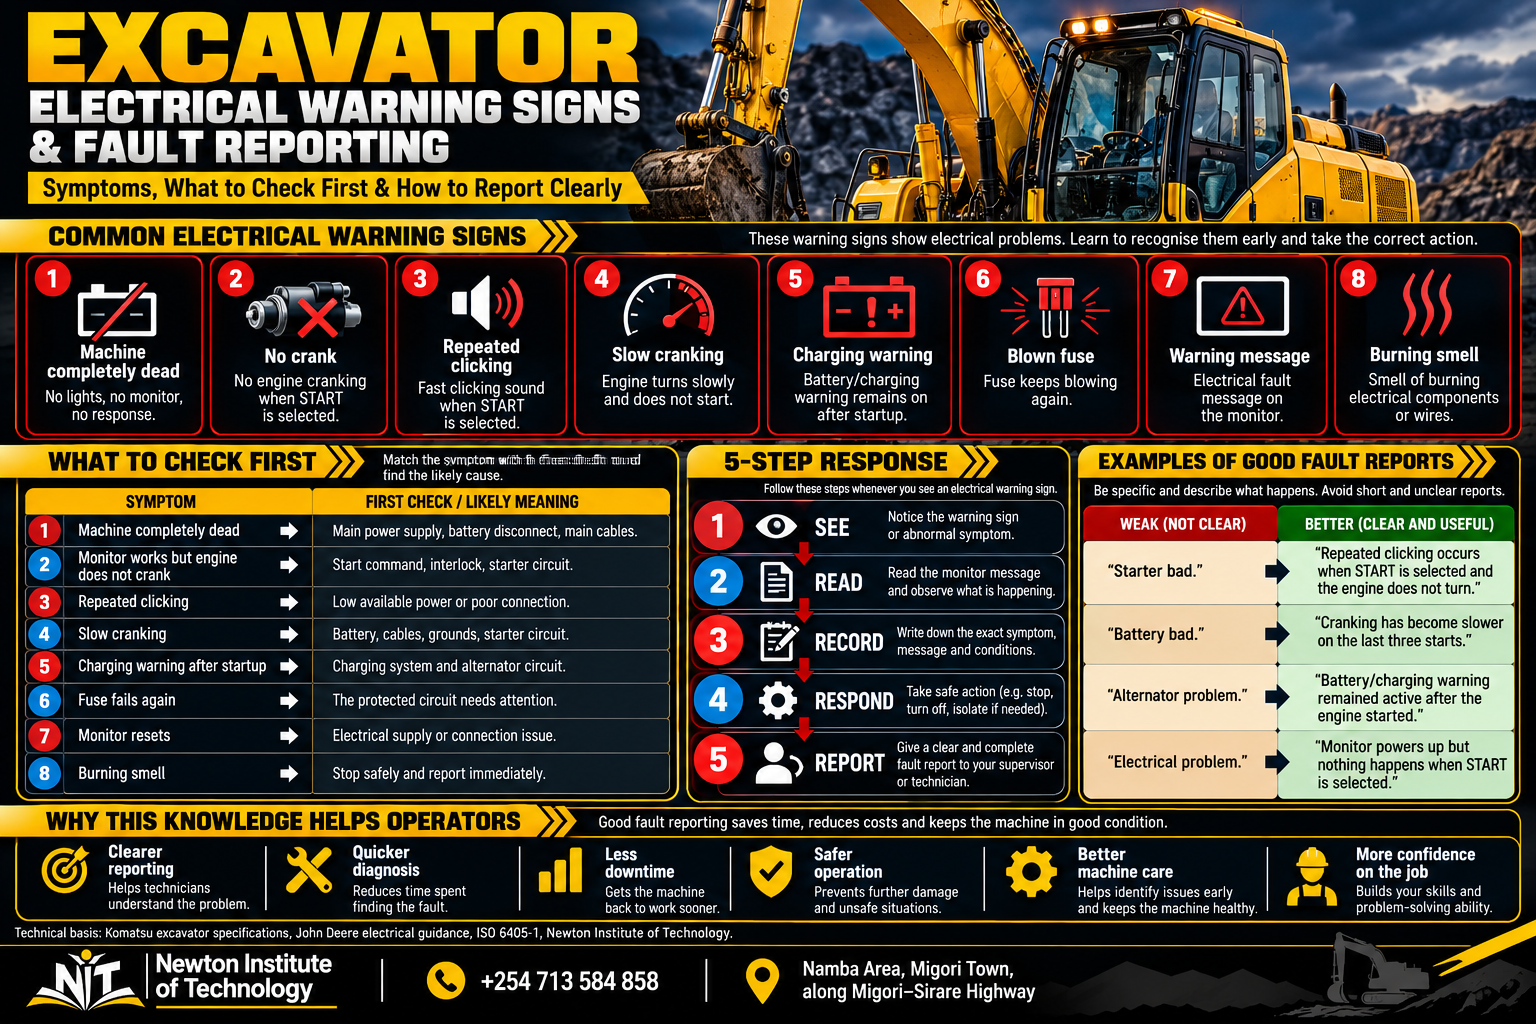
SEE → READ → RECORD → RESPOND → REPORT. Read the complete monitor message, record the exact code or symptom, take the required machine action and give the information to the responsible person.
Clear communication
Good electrical fault reports save diagnostic time
| General statement | Better operator report |
|---|---|
| “Electrical problem.” | “Monitor powers up but nothing happens when START is selected.” |
| “Bad battery.” | “Engine has cranked more slowly on the last three starts.” |
| “Starter problem.” | “Repeated clicking occurs when START is selected; engine does not turn.” |
| “Alternator bad.” | “Battery/charging warning remains after the engine starts.” |
| “Sensor problem.” | “Coolant-temperature warning appeared after about 35 minutes under load.” |
| “Fuse problem.” | “The same work-light fuse has failed twice.” |
| “Dashboard problem.” | “Monitor resets during cranking but stays on once the engine is running.” |
| “Broken wire.” | “Harness beside the boom base has rubbed through its outer insulation.” |
On a small screen, swipe horizontally to view the full table.
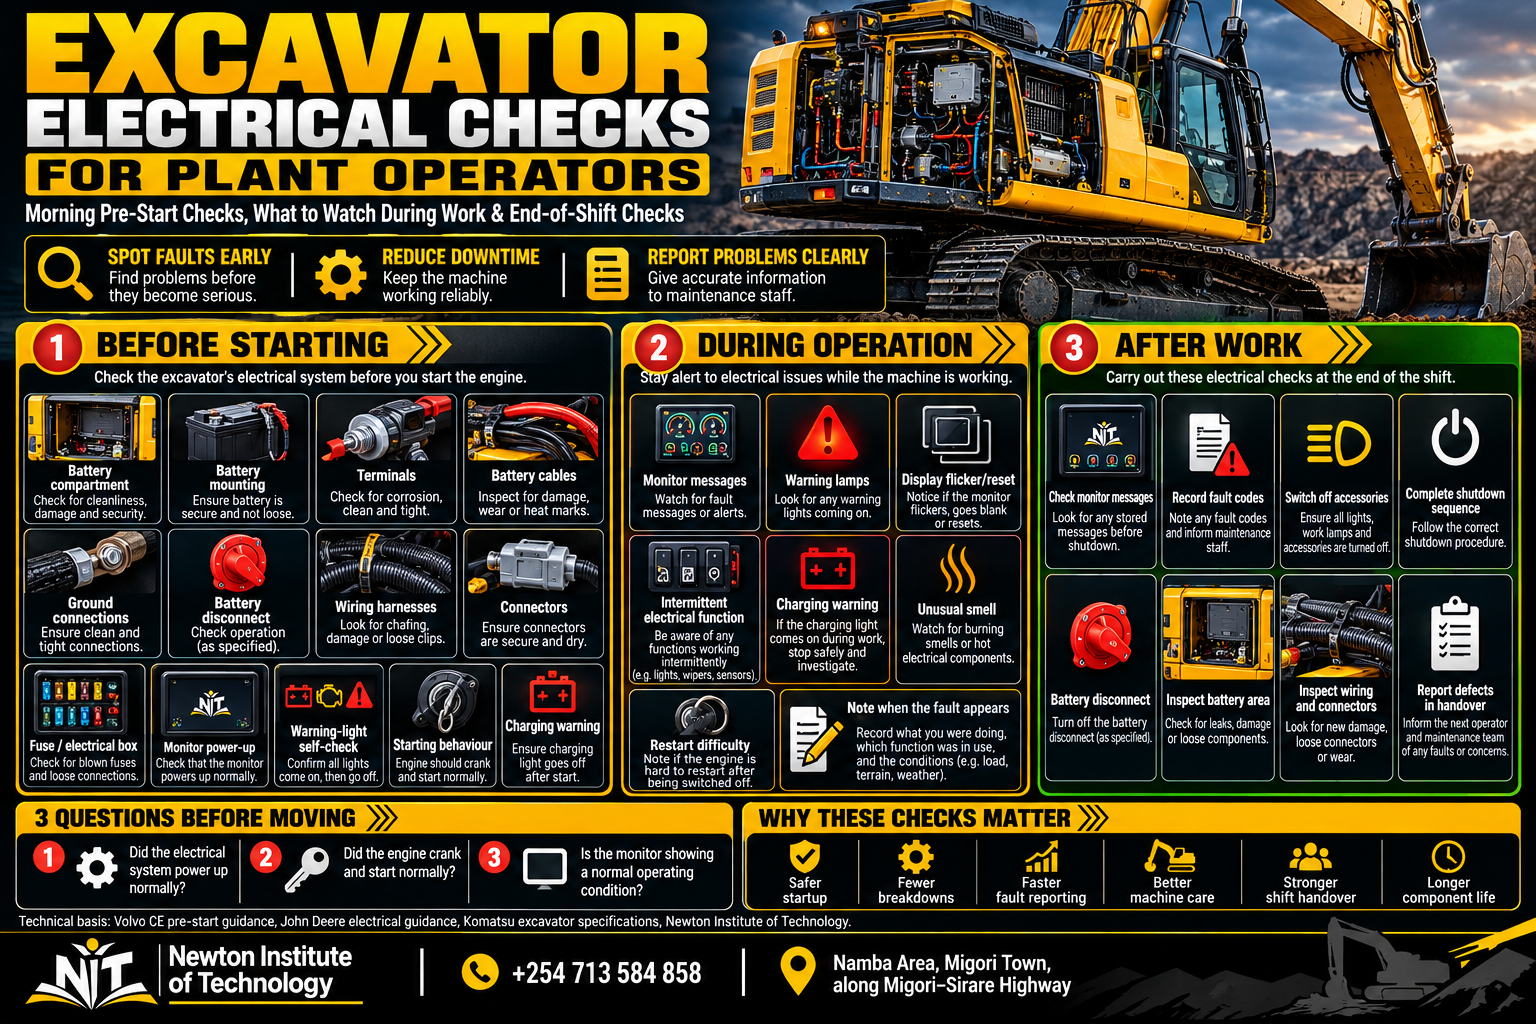
Before starting
Morning electrical-system checks
This section stays with the electrical system. NIT’s Plant Operator Pre-Start Inspection Checklist covers the complete machine, including the work area, undercarriage, attachments, fluids, hydraulics, cab and functional checks. [7]
| Inspection point | What the operator checks |
|---|---|
| Battery compartment | Damage, leakage, contamination and secure mounting. |
| Battery terminals | Corrosion, looseness and visible damage. |
| Battery cables | Cuts, rubbing, heat marks and loose routing. |
| Ground connections | Secure accessible straps and cable ends. |
| Battery disconnect | Correct operating position. |
| Wiring harnesses | Abrasion, crushing, heat damage and exposed wiring. |
| Connectors | Loose, damaged, wet or contaminated plugs. |
| Fuse / electrical compartment | Secure covers, dry condition and no evidence of overheating. |
| Starter / alternator wiring | Visible cable and connector condition where safely accessible. |
| Sensor wiring | Secure accessible connectors and undamaged harnesses. |
| Work lights, horn and alarms | Correct operation where fitted or required. |
| Monitor power-up | Normal startup sequence and warning-lamp self-check. |
| Cranking behaviour | Normal starter sound and engine cranking speed. |
| After startup | Normal monitor condition and no unexplained charging warning. |
| Smell | No abnormal burning or overheated-electrical smell. |
On a small screen, swipe horizontally to view the full table.
Volvo’s excavator walk-around guidance includes the battery compartment and electrical box as pre-start inspection areas. [2]
During operation
What to watch while the excavator is working
The operator spends hours in the best observation position on the machine: the seat. Changes that appear only under load, heat or vibration are useful clues.
Monitor messages
Read new messages and note when they appear.
Display behaviour
Notice flicker, dimming, blanking or unexpected resets.
Charging indication
Record any battery/charging warning that appears during the shift.
Intermittent functions
Notice lights, alarms, controls or sensors that cut in and out.
Smell and heat
Pay attention to a new electrical smell or visible overheating evidence.
Operating condition
Record whether the fault appears while digging, tracking, swinging, hot, wet or on rough ground.
End of shift
What the operator should check after work
| End-of-shift point | Operator action |
|---|---|
| Monitor | Note active messages before shutdown. |
| Fault codes | Record any code seen during the shift. |
| Lights and accessories | Leave them in the correct shutdown condition. |
| Shutdown sequence | Complete the machine’s normal shutdown process. |
| Battery disconnect | Leave it in the specified end-of-shift position. |
| Battery area | Check for new heat, smell, damage or leakage. |
| Wiring | Inspect areas exposed to branches, debris, heat or machine movement. |
| Connectors | Report new looseness, damage or moisture. |
| Electrical compartment | Check for moisture and signs of overheating. |
| Intermittent problems | Write down what happened and when. |
| Handover | Tell the next operator or supervisor exactly what changed. |
On a small screen, swipe horizontally to view the full table.
Volvo’s end-of-day guidance includes shutdown, battery-disconnect use on applicable equipment and a final machine walk-around. [4]
Follow the evidence
Two operator-level fault sequences
Engine does not turn
Check whether the monitor powers up, whether the battery disconnect is in operating position, whether an interlock message appears, and whether START produces silence, one click, repeated clicking or slow rotation. Record the sequence.
Warning remains after startup
The engine has started and the starter has completed its job. Read the charging message, observe any other electrical changes and report the condition so the charging circuit can be tested.
Newton Institute of Technology practical
How NIT demonstrates the excavator electrical system on the machine
Newton Institute of Technology’s published excavator programme runs for two months and uses an approximately 70% practical / 30% theory training structure. NIT’s current excavator training information includes practical work using CAT 320D and JCB equipment. [10]
Start at the battery compartment
Identify the batteries, main cables, mounting and ground connection. Compare sound routing and mounting with examples of corrosion or damaged insulation.
Locate the battery disconnect
Connect the physical switch to the electrical flow: battery → disconnect → machine electrical system.
Find the starter motor
Trace the starting idea from battery supply to relay/solenoid and starter motor.
Compare starting sounds
Discuss normal cranking, slow cranking, one click and repeated clicking as different observations.
Find the alternator
Connect the alternator to what changes after the engine starts: charging output replaces the starting phase.
Open the fuse and relay area
Use the machine’s own identification to match protection devices with the circuits they serve.
Follow one wiring harness
Look at clips, bends, connectors, heat exposure and the points where vibration or rubbing can occur.
Identify selected sensors
Ask what condition each visible sensor detects and how the operator may see that information.
Power up without starting
Watch which indicators, gauges and display areas become active before the starter is engaged.
Start the excavator
Observe three stages: electrical power on → engine cranking → engine running.
Read the monitor after startup
Compare key-on indications with the normal running display and record any message exactly.
Practise a no-crank report
Describe what the monitor did, what sound was heard and whether the engine turned.
Practise a charging report
Recognise that the engine has started but the charging side is still reporting a condition.
Perform the morning route
Battery → cables → grounds → disconnect → wiring → connectors → electrical compartment → monitor → starter behaviour.
Finish with shutdown and handover
Complete the shutdown sequence, final electrical inspection and one clear defect report.
Locate → inspect → power up → start → observe → record → shut down → report. The learner connects every component to something visible, audible or reportable on the real machine.
How this guide fits the NIT series
Article 154 owns the electrical-system topic
NIT’s Excavator Parts and Functions remains the whole-machine overview. The Plant Operator Pre-Start Inspection Checklist remains the full daily inspection guide. The Excavator Hydraulic System owns oil flow, pumps, valves, cylinders and hydraulic motors, while the Excavator Cooling System owns coolant flow, radiator performance and overheating checks. [7] [8] [9] [11]
Quick reference
Excavator electrical system FAQs
What does an excavator battery do?
The battery stores electrical energy and supplies the starting system and other electrical circuits before the engine is producing charging output.
What does the starter motor do?
The starter motor turns the engine during startup until the engine begins running under its own power.
What does the alternator do?
The alternator produces electrical output while the engine runs, supports electrical loads and restores battery charge.
Why does an excavator click but not crank?
Record whether the sound is one click or repeated clicking and whether the monitor dims or resets. Battery supply, connections, grounds, relays, solenoid and the starter circuit can then be checked systematically.
Why does an excavator crank slowly?
Slow cranking directs attention to the electrical power available to the starter and the condition of the battery, cables, connections, grounds and starting circuit.
Why does the battery warning stay on after the engine starts?
The engine has started, but the machine is still reporting a charging-system condition. Record the indication and have the charging circuit checked.
Can I use a larger fuse if the original keeps blowing?
Use the specified fuse rating. A repeated failure of the correct fuse points toward a fault in the protected circuit. [5]
What do excavator sensors do?
Sensors detect machine conditions and send electrical information to controllers and monitoring systems. Depending on the machine, they can report temperature, pressure, speed, position, level and other operating conditions.
What information should I record when an electrical fault appears?
Record the exact message or code, what the excavator was doing, whether the engine was starting or already running, how long the condition lasted, and any unusual sound, smell or visible damage.
Operator memory cue
Supply, start, charge, monitor and report
The battery supplies starting power. The starter turns the engine. The alternator supports the electrical system once the engine runs. Fuses protect circuits. Relays switch circuits. Wiring carries power and information. Sensors detect machine conditions. Controllers process those signals. The monitor communicates with the operator.
Once those relationships are understood, electrical symptoms stop looking random. Slow cranking, repeated clicking, a charging warning, a fuse that fails twice, a rubbed harness and a fault code all become useful information.
Learn the machine beyond the controls
Register for Excavator Operator Training at Newton Institute of Technology
Build practical excavator skills in machine familiarisation, pre-start inspection, controls, operation, warning recognition, daily machine care, shutdown and clear defect reporting through supervised practical training.
CourseExcavator Operator Training
Duration2 months · approximately 70% practical / 30% theory
Call / WhatsApp+254 713 584 858
LocationNamba Area, Migori Town · along Migori–Sirare Highway
Technical references
- Komatsu. PC650LC-11 Large Excavator — Specifications and Standard Equipment. Electrical-system specification listing a 24 V/90 A alternator, two 12 V/170 Ah batteries, battery disconnect switch, circuit breaker and 24 V/11 kW starting motor. Accessed 30 September 2026. komatsu.com.
- Volvo Construction Equipment. Keep Your Excavators Running Their Best With This Prestart Checklist. Daily walk-around guidance including the battery compartment and electrical box. Accessed 30 September 2026. volvoce.com.
- John Deere. Cleaning or Replacing Battery — Service Electrical. Battery-gas, spark, direct-metal-contact and booster-battery safety guidance. Accessed 30 September 2026. manuals.deere.com.
- Volvo Construction Equipment. End-of-Day Construction Equipment Checklist. Shutdown, main battery disconnect and final walk-around guidance. Accessed 30 September 2026. volvoce.com.
- John Deere. Load Center Fuses. Electrical service guidance specifying that replacement fuses use the same rating as the original. Accessed 30 September 2026. manuals.deere.com.
- International Organization for Standardization. ISO 6405-1:2017 — Earth-moving machinery — Symbols for operator controls and other displays — Part 1: Common symbols. Edition 3, published 2017; reviewed and confirmed in 2022. Accessed 30 September 2026. iso.org.
- Newton Institute of Technology. Plant Operator Pre-Start Inspection Checklist Kenya. NIT’s complete whole-machine daily inspection framework. Accessed 30 September 2026. niteducation.com.
- Newton Institute of Technology. Excavator Hydraulic System: Components, Oil Flow & Checks. Dedicated guide to hydraulic pumps, flow, pressure, valves, cylinders and motors. Accessed 30 September 2026. niteducation.com.
- Newton Institute of Technology. Excavator Cooling System: Parts, Overheating & Daily Checks. Dedicated cooling-system and overheating guide. Accessed 30 September 2026. niteducation.com.
- Newton Institute of Technology. Excavator Operator Training in Kenya. Current NIT training information covering the two-month course, approximately 70% practical / 30% theory structure and practical training context. Accessed 30 September 2026. niteducation.com.
- Newton Institute of Technology. Excavator Parts and Functions: Operator Guide Kenya. Whole-machine component overview and existing electrical-system introduction. Accessed 30 September 2026. niteducation.com.
Prepared by: Newton Institute of Technology Editorial Team · Institutional / technical review: Engineer Simon Barongo · Updated: 30 September 2026.