

NIT Excavator Operator Guide G4 · 2026
Excavator Greasing Points:
Boom, Arm, Bucket & Swing Bearing
Inspect → Clean → Grease → Verify
A practical operator guide to excavator grease points, lubrication intervals, morning checks, correct greasing technique and end-of-shift inspection.
Operator greasing routine
Where are the main grease points on an excavator?
The main grease points are around the boom base, boom cylinder, boom-to-arm joint, arm cylinder, bucket cylinder, bucket linkage, bucket pivot and swing bearing. Some machines also have separate lubrication points for the swing gear or pinion and for a quick coupler.
The exact locations and intervals come from the excavator’s lubrication chart. Manufacturer examples show why that matters: Develon’s DX10z lists several bucket pivots at 8–10 hours and its swing-circle bearing at 50 hours, while John Deere’s E230C lists bucket/linkage lubrication every 10 hours or daily, boom/arm/cylinders every 50 hours and the swing bearing every 250 hours. [3] [5]
Trace the fitting to the pin, bush or bearing it serves. Remote grease blocks can place the nipple far from the actual joint.
Bucket, boom and swing points can have different schedules on the same excavator. [3] [5]
For purge-type linkage joints, fresh grease at the pin confirms that lubricant has travelled through the grease path. [1]
Greasing is useful only when the right lubricant reaches the right joint at the right interval.
Caterpillar treats linkage-pin inspection as part of daily maintenance and tells operators to look for damaged bolts, washers, plates, grease fittings, leaks, rust, grease buildup and damaged autolube lines. It also recommends cleaning fittings before lubrication and pumping grease until it begins to emerge from the linkage joint where that purge procedure applies. [1]
This guide stays focused on lubrication points and operator checks. For whole-machine anatomy, use NIT’s Excavator Parts and Functions guide. For the complete pre-start route, use the Plant Operator Pre-Start Inspection Checklist.
Machine-side reference
Main excavator greasing points
Start at the upper frame and follow the working equipment out to the bucket. Develon service information identifies separate lubrication locations for the boom connection pin, boom cylinder, arm cylinder, boom-to-arm connection, bucket cylinder, bucket link and arm-to-bucket connection. [4]
| Area | Grease point to identify | What it serves |
|---|---|---|
| Boom base | Boom-to-upper-frame pivot | Main boom foot pin and bushings. |
| Boom cylinder | Base/head-end and rod-end pivots | Cylinder mounting joints. |
| Boom-to-arm | Main connecting pin | Primary articulation between boom and arm. |
| Arm cylinder | Base/head-end and rod-end pivots | Arm-cylinder mounting joints. |
| Bucket cylinder | Base/head-end and rod-end pivots | Bucket-cylinder mounting joints. |
| Bucket linkage | Control-link / bell-crank / link pivots | Linkage that converts cylinder movement into bucket curl. |
| Arm-to-bucket | Main bucket pivot | Bucket connection to the arm. |
| Quick coupler | Coupler pivots where fitted | Moving coupler joints. |
| Swing bearing | Slew/swing-bearing grease point | Bearing supporting upperstructure rotation. |
| Swing gear / pinion | Separate point where provided | Open gear or pinion lubrication system. |
When several fittings are grouped on a remote grease manifold, the fitting may be beside the operator while the pin it lubricates is metres away. Trace the grease path before servicing.

From the upper frame
Boom grease points
Boom-base pin
Inspect both ends of the boom-foot pin, the retaining hardware, seals, grease fittings or remote lines and the grease condition around the joint. Caterpillar’s linkage inspection includes bolts, washers, plates, fittings, rust, leakage and grease buildup. [1]
Boom-cylinder pins
Trace the cylinder from its base/head end to the rod end. These are separate loaded joints; greasing the boom-base pin does not lubricate the cylinder pivots.
Follow the steelwork outward
Boom-to-arm and arm-cylinder grease points
The main boom-to-arm pin repeatedly changes direction under digging load. Around it, inspect grease delivery, retaining hardware, seals and joint clearance. Then follow the arm cylinder from its head end to its rod end and identify both pivot locations.
Develon lists the boom/arm connection and both ends of the arm cylinder as separate lubrication locations. [4]
Highest-contamination zone
Bucket and bucket-linkage grease points
The bucket end works directly in soil, sand, mud and rock, so dirt often gathers around the fittings. Identify the bucket-cylinder pivots, linkage/bell-crank pivots, arm-to-bucket pin and any quick-coupler pivots fitted to the machine.
Bucket-cylinder head end
Find the cylinder mounting point on the arm.
Bucket-cylinder rod end
Find the rod-end connection driving the linkage.
Linkage pivots
Inspect the control link, bell crank or H-link joints used by that machine.
Main bucket pivot
Check the arm-to-bucket pin for grease delivery and changing play.
For purge-type linkage joints, Caterpillar directs operators to clean the fitting and pump grease until it begins to emerge from the pin joint. [1]
Do not group the whole swing system together
Swing bearing, swing gear and swing gearbox are different service points
Swing bearing / slew ring
The large bearing supports the rotating upper structure. It follows its own grease interval and distribution procedure.
Swing gear or pinion
The gear teeth that transmit rotation can use a separate grease point or grease bath. Develon’s DX10z lists the swing-circle bearing and swing-circle pinion as separate items. [3]
Swing gearbox
The reduction gearbox normally has its own gear-oil specification and service interval rather than being treated as a linkage grease point.
The DX10z manual specifies a defined number of grease-gun pumps followed by controlled upperstructure rotation to distribute lubricant around the swing bearing. That example shows why the swing bearing should be serviced from its own machine-specific procedure. [3]
Hour meter first
How often should an excavator be greased?
There is no single interval for every grease point. The correct schedule is the one published for the excavator and the working conditions.
| Manufacturer example | Working-equipment lubrication | Swing-bearing lubrication |
|---|---|---|
| Develon DX10z | Bucket link and bucket pivots: 8–10 hours. | Swing-circle bearing: 50 hours. |
| John Deere E230C | Bucket/linkage: 10 hours or daily; boom, arm and cylinders: 50 hours. | Swing bearing: 250 hours. |
| Cat mini-excavator example | Boom, stick, bucket cylinder and linkage: 10 hours or daily in severe use. | Slew-ring points shown with longer intervals on the example machine. |
Sources: Develon DX10z manual, John Deere E230C service intervals and Caterpillar mini-excavator maintenance guidance. [3] [5] [6]
Inspect the lubrication points during the daily walk-around. Grease each point when its service interval becomes due. Caterpillar also recommends shorter intervals for linkage pins in wet or sandy conditions, while Develon service information calls for shorter lubrication intervals in water or dusty work. [2] [4]
Operator value
25 reasons a plant operator should understand excavator greasing
Keep loaded joints lubricated
Correct grease reduces friction and helps protect pins and bushings carrying repeated digging loads.
Find changes early
A dry joint, blocked fitting, damaged grease line or increasing play becomes easier to recognise when the operator knows the normal condition.
Name the exact joint
“Boom-to-arm grease point will not accept grease” gives maintenance personnel a much better starting point than “there is a greasing problem.”
Why this knowledge matters
Practical operator benefits
Caterpillar links regular lubrication with smooth movement and contaminant purging, and identifies poor lubrication as a major cause of accelerated pin and bushing wear. [1] [2]
- Reduce friction between pins and bushes.
- Slow wear at heavily loaded pivot joints.
- Help prevent pin galling.
- Protect the boom-base pivot.
- Protect the boom-to-arm joint.
- Protect bucket pins working in abrasive material.
- Protect bucket-linkage pivots.
- Keep boom movement smoother.
- Keep arm movement smoother.
- Help maintain accurate bucket response.
- Support normal joint clearances for longer.
- Help push contamination from purge-type joints.
- Make blocked grease fittings easier to notice.
- Make broken remote grease lines easier to identify.
- Show when a joint is not receiving lubricant.
- Help identify an automatic-lubrication delivery problem.
- Make squeaking and knocking easier to interpret.
- Help detect increasing pin movement early.
- Make missing pin-retaining hardware easier to notice.
- Protect the swing bearing through scheduled lubrication.
- Prevent the swing system from being treated like an ordinary bucket pin.
- Reduce avoidable downtime caused by neglected joints.
- Improve defect reporting because the exact joint can be named.
- Improve shift handover between operators.
- Build stronger machine knowledge and operator competence.
Lubrication-focused pre-start
Morning checks for the excavator greasing system
This is the lubrication portion of the walk-around, not the whole excavator pre-start inspection.
Read the hour meter
Know which lubrication points have reached their scheduled interval.
Start at the bucket
Check bucket pins, linkage pivots, cylinder connections, retainers and visible grease condition.
Move up the arm
Inspect the bucket-cylinder head end, arm-cylinder pivots and boom-to-arm joint.
Inspect the boom
Check boom-cylinder pivots and the boom-base pin.
Check fittings
Confirm grease nipples are present, secure and accessible.
Follow remote lines
Look for cuts, crushing, loose connections and grease escaping before the joint.
Check autolube
Inspect the grease supply and visible distribution lines where the system is fitted. Caterpillar specifically includes autolube-line condition in linkage inspection. [1]
Inspect the swing point
Locate the swing-bearing fitting or grease bank and check its condition.
Read the grease
Notice a joint that is dry, contaminated, leaking from a line or producing unusual debris.
Listen on first movement
A new squeak, knock or clack is worth locating. Caterpillar includes squeaking joints among linkage-inspection clues. [1]

Machine-side method
How to grease an excavator pin joint correctly
Position the excavator
Place the machine in the servicing position specified for that model, lower the working equipment and complete the normal shutdown setup.
Identify the point
Use the lubrication chart and confirm which joint the fitting serves.
Clean the fitting
Remove mud, sand and old contaminated grease before attaching the grease gun. Caterpillar directs operators to clean linkage fittings before lubrication. [1]
Inspect nipple and line
Make sure the fitting is secure and any remote hose or tube is intact.
Connect the grease gun
Seat the coupler squarely so grease enters the fitting cleanly.
Apply the specified grease
Use the grease grade and service method stated for the machine and operating conditions.
Watch the joint
For purge-type linkage joints, confirm fresh grease begins to emerge at the intended pin. [1]
Clean and record
Remove contaminated excess grease and record damaged fittings, blocked points, loose retainers or abnormal movement.
When grease will not go in
What if a grease fitting will not take grease?
If the point still does not accept grease, record the exact location. “Boom-to-arm grease point will not take grease” is a useful defect report because it identifies the joint immediately.
Mud, water and abrasive dust
Greasing after severe operating conditions
Wet, sandy and dusty work can increase contamination around pins and bushes. Caterpillar recommends shorter linkage-pin greasing intervals in wet or sandy conditions, and Develon service information tells operators to shorten lubrication intervals when working in water or dusty places. [2] [4]
After severe work
Reset the joints for the next shift
Clean first, then inspect and lubricate according to the machine schedule.
- Expose and clean the grease fittings.
- Remove packed mud around bucket and linkage pivots.
- Inspect visible seals and grease lines.
- Check whether the manufacturer’s severe-condition interval is now due.
- Lubricate the specified points with the correct grease.
- Confirm delivery at applicable linkage joints.
- Remove heavily contaminated expelled grease.
End-of-shift machine care
What should the operator check after work?
Clean the bucket linkage
Remove packed material covering pins, retainers and grease fittings.
Recheck bucket pivots
Look for new looseness, damaged retainers, unusual grease loss or a joint that has become noticeably dry.
Follow arm and boom joints
Compare the pivots with their condition at the start of the shift.
Inspect grease lines
Check that no hose or tube has been cut, crushed or pulled loose during work.
Check the swing area
Inspect the swing-bearing lubrication point and visible condition around the bearing.
Check autolube supply
Where fitted, confirm that the system has sufficient grease and visible lines remain intact.
Complete due greasing
Use the hour meter and lubrication chart to service points that reached their interval during the shift.
Record what changed
Name the exact joint, fitting or line so the next action is clear.
Read the joint
What the grease around a joint can tell you
| What you see | What it suggests | Operator response |
|---|---|---|
| Fresh grease appears normally | The grease path is delivering to the joint. | Complete the specified servicing step and clean excess contaminated grease. |
| Grease comes from a remote hose before the joint | The delivery line or connection is leaking. | Record the damaged line and the joint it serves. |
| Grease gun becomes unusually difficult to operate | The fitting or passage may be restricted. | Check the connection, nipple, line and joint position. |
| One joint stays dry | Grease may not be reaching the intended pin or bush. | Trace the delivery path. |
| Grease contains obvious grit | Contamination is present around the joint. | Clean the area and inspect how dirt is entering. |
| Excessive play remains after greasing | Mechanical wear is present in the pin/bush system. | Record the movement for mechanical inspection. |
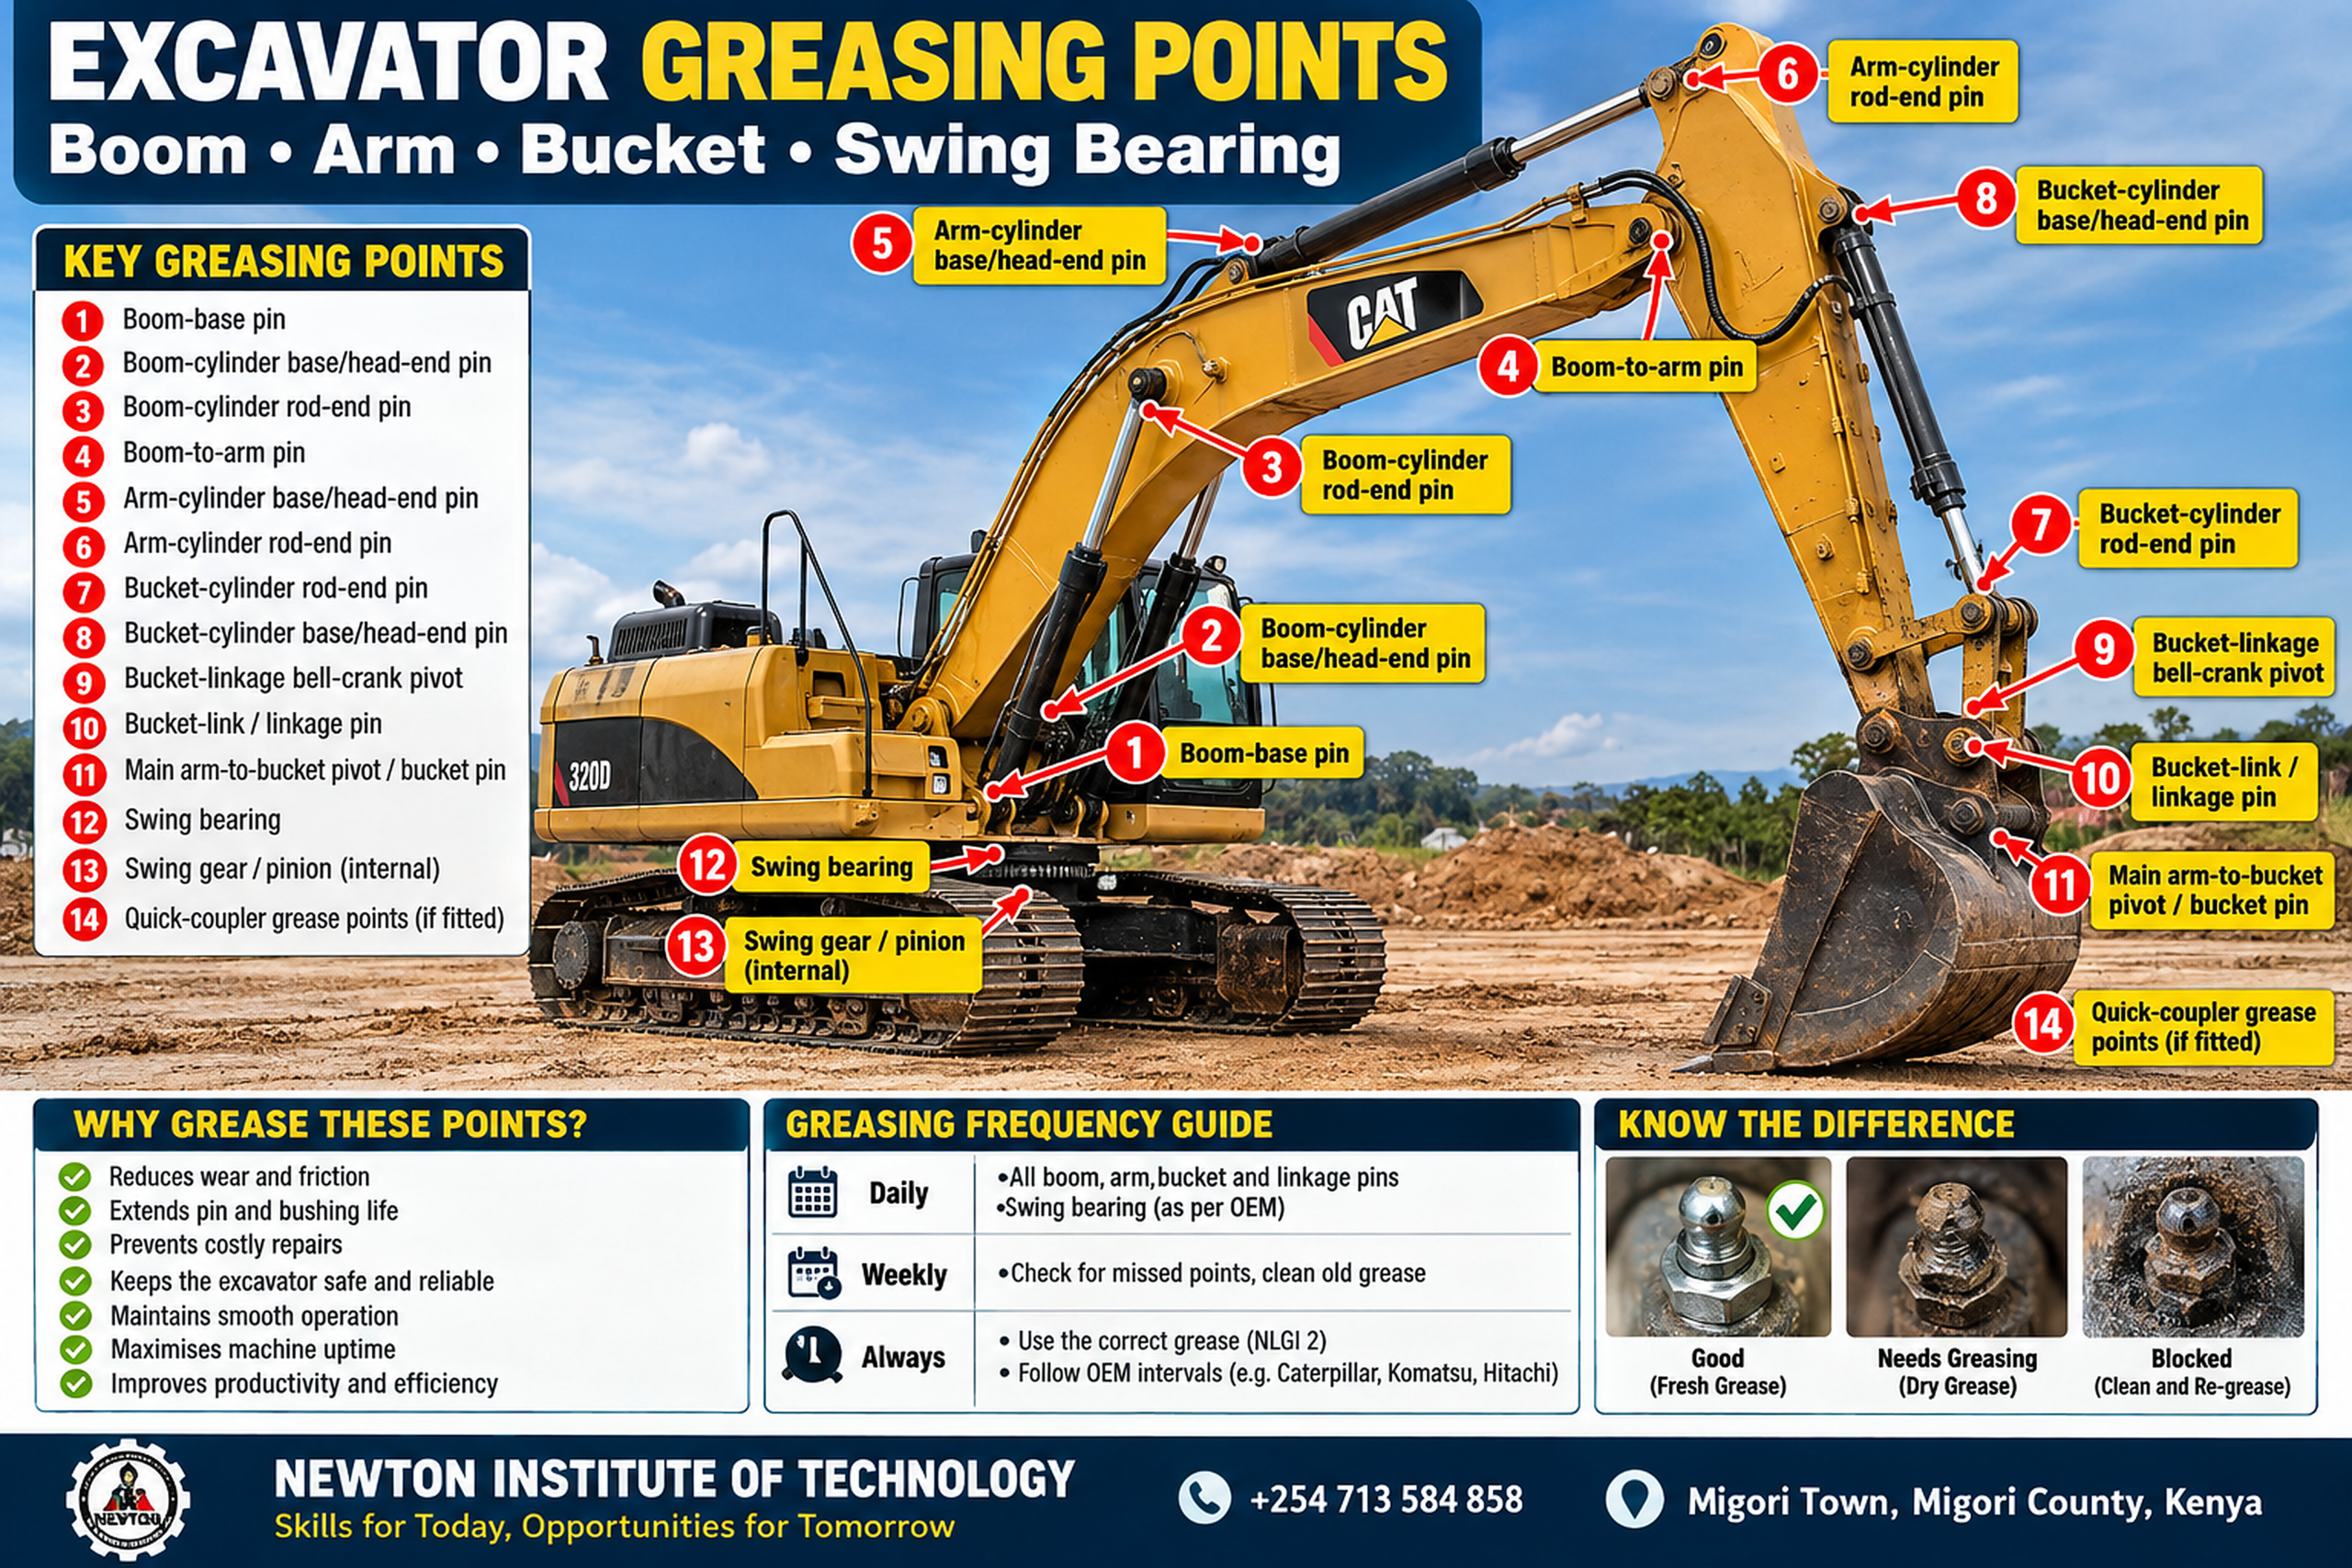
Newton Institute of Technology practical
How NIT demonstrates excavator greasing on the machine
Newton Institute of Technology’s plant-operator materials emphasise supervised practical training, pre-start inspection, safe operating habits and basic machine care. NIT’s excavator training page documents practical training on CAT 320D and JCB equipment. [7] [8]
Identify the joints
Walk from bucket to upper frame and name each pivot: bucket, linkage, bucket cylinder, arm, arm cylinder, boom-to-arm, boom cylinder, boom base and swing bearing.
Match fittings to joints
Trace each nipple or remote grease line to the component it serves so the learner understands the grease path.
Read the lubrication chart
Identify the required grease, service interval, machine position and any quantity or rotation instruction for the point being serviced.
Inspect before greasing
Check the nipple, line, pin retainer, visible joint condition and contamination before attaching the grease gun.
Apply and verify
Use the machine procedure and watch the joint. The learner must confirm where the lubricant is going rather than judging only by grease-gun resistance.
Diagnose the result
Discuss a blocked fitting, leaking remote line, dry autolube-fed joint, missing retainer or bucket pin that still has excessive play.
Study swing lubrication separately
Identify the swing bearing, gear/pinion and gearbox as different components and use the exact procedure for the training machine.
Inspect again after work
Repeat the same route after machine operation and record what changed during the practical session.
Identify → inspect → clean → lubricate → verify → operate → inspect → record. The goal is to understand what is happening at the joint, not simply to pump grease into fittings.
Common errors
Excavator greasing mistakes that shorten component life
Missing a point
The operator sees several nipples but does not know which joints they serve.
Greasing through dirt
Mud and grit remain around the nipple when the grease gun is attached.
Using one interval everywhere
Boom, bucket and swing points can follow different schedules. [3] [5]
Ignoring a blocked fitting
The joint remains without normal lubrication because the restriction is never traced.
Watching the gun, not the joint
Grease entering a nipple does not prove that it reached the intended pin when the path is damaged or blocked.
Ignoring remote or autolube lines
A full reservoir can coexist with one damaged delivery branch. [1]
Treating the swing bearing like a bucket pin
The swing system follows a separate lubrication procedure. [3]
Trying to grease away mechanical wear
Lubricant cannot restore material that has already worn from a pin or bushing.
Common questions
Excavator greasing FAQs
Where are the main grease points on an excavator?
Most are around the boom base, boom cylinder, boom-to-arm connection, arm cylinder, bucket cylinder, bucket linkage and bucket pivot. The swing bearing also has lubrication points, and some machines provide separate lubrication for the swing gear or pinion. [4]
How often should excavator pins be greased?
Many linkage pins are serviced daily or around every 8–10 operating hours, but the exact interval depends on the machine and component. Caterpillar gives 8–10 hours as common linkage guidance; individual OEM schedules remain the final reference. [2]
Is the swing bearing greased every day?
Should grease appear around an excavator pin?
Where the manufacturer uses a purge-style procedure for that linkage joint, fresh grease appearing at the pin confirms delivery through the grease path. Caterpillar describes this method for linkage pins. [1]
Why will a grease nipple not take grease?
Check the grease-gun connection, nipple, remote line, joint position and lubrication passage in that order. Record the exact point if the restriction remains.
Can an automatic lubrication system still leave a joint dry?
Yes. A damaged or blocked individual delivery line can leave one joint without grease while the reservoir still contains lubricant. Caterpillar includes autolube-line inspection in its linkage-pin checks. [1]
What grease should an excavator use?
Use the grease specification stated for the excavator, component and operating conditions. The grease type is part of the machine’s lubrication schedule.
Five-question operator rule
Know the joint, interval, grease, delivery and condition
At every grease point, be able to answer five questions: What joint am I lubricating? When is it due? What lubricant does it require? Is grease reaching the joint? Has this joint changed since the last inspection?
Once those questions become routine, greasing becomes part of understanding the excavator rather than a task performed by memory.
Learn the machine beyond the controls
Register for Plant Operator Training at Newton Institute of Technology
Build practical excavator skills in machine familiarisation, daily inspection, controlled operation, greasing awareness and operator-level machine care through supervised plant-operator training.
Call / WhatsApp+254 713 584 858
LocationNamba Area, Migori Town · along Migori–Sirare Highway
LandmarkAbout 0.3 km opposite Rubis Filling Station
Websiteniteducation.com